
Imagine for a moment that you were a test robot designed to diligently follow a test script. Your key challenge is to enact a textual instruction on a graphical user interface. If you are testing web applications your instructions could be a CSS string along the line of ".posts:n-th(3) button:has(.pencil)." This could be translated as the third post's edit button, but has a deep dependency on the structure of the application.
The textual description is often preferred by developers when writing unit tests. They implicitly check for a consistent naming of elements in a computer language, which web developers love. Problems emerge with increasing distance between developers and testers. Imagine you were integration testing some applications, you would rather not rely on each contributor's identification scheme. Surely, you would want the computer to speak your language, not the other way around.
The easiest way to show what you expect from your application is a screenshot. This would make it possible to verify the tested feature quickly. Error messages would be instantly readable as two deviating pictures. Any failures would be reported as visible artefacts that testers can see and fix without knowing internal structures. You would get what you see. So let’s look at imaged based UI testing.
Organising your images
When using images in test descriptions, we are moving into a document type that contains textual code along with pictures embedded in between. While writing this very article I am using a word processor that has no problems placing images. Cutting and pasting is a breeze. When writing automated tests, I also need syntax highlighting and refactoring features, which I can only get in pure text environments that do not support embedded images. Once your tests grow into thousands of test steps, the images that must be stored in separate files invariably increases. Why can't I have both, modern coding support and inlined images?
Consider the following sequence of actions in a style that you would expect to occur in a user hand book. The test steps can be clearly read, including subtle colour effects resulting from hovering and a coloured frame around an activated element:
| 1. | Open Page | https://ministryoftesting.com |
| 2. | Click on |  |
| 3. | Hover over |  |
| 4. | Check and click on |  |
| 5. | Click on |  |
| 6. | Click on |  |
| 7. | Enter text | “My proposal” |
| 8. | Check | 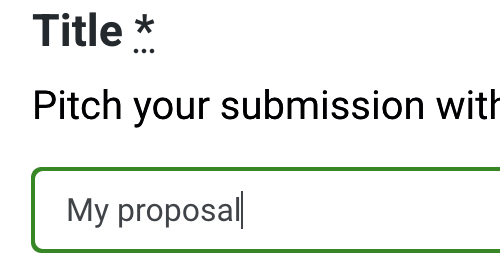 |
Figure 1: A human-readable sequence of test steps, including interactable items and graphical effects.
The following code block shows how these test steps would be translated into Playwright, an automated testing tool with visual features. A similar picture would arise when using Cypress and Selenium. Since the actual test code does not show the referenced images inline, the test description is not making optimal use of the images.
However, it comes with a web interface that visualises the images and allows resetting the baseline if changes are accepted. To invoke the method you would name the reference image. An image file will be automatically created when the test has its first run or the baseline is reset. The baseline is recorded for each screen size and each browser.
Although the compared region can be narrowed down, it must be located at the same spot on screen. To check if a current screen complies with previously stored version you can use a command like cy.compareScreenshot.toMatchImageSnapshot(<your reference file>) in Cypress or expect(page).toHaveScreenshot(<your reference file>) in Playwright.
test('MoT proposal' , async ({ page}) => {
await page.goto("https://ministryoftesting.com")
await page.locator("[alt='Profile image']").click();
await expect(page).toHaveScreenshot("avatar.png");
await page.locator(".dropdown-item[href='/my-mot']").hover();
await expect(page).toHaveScreenshot("my-mot-hovered.png");
await page.locator(".dropdown-item[href='/my-mot']").click();
await expect(page).toHaveScreenshot("my-proposals.png");
await page.locator("a[href='/my-mot/proposals']").click();
await expect(page).toHaveScreenshot("contribute.png");
await page.locator(".btn[href='/contribute']").click();
await page.keyboard.type("My proposal");
await expect(page).toHaveScreenshot("new-proposal.png");
})
Code Example 1: Test steps with image comparison written in Playwright. The framework automatically takes care of storing the reference images at first run and when a reset is requested.
An active use of images when defining the test execution is possible with Appium. In the mobile testing ecosystem you often need to click on elements that do not have reasonable IDs or textual locators. Sometimes you need to make gestures over some unnamed screen areas. The above test steps could be written in Python using the Appium framework, as shown below. Internally, Appium uses OpenCV's template matching method to scan the entire screenshot for the stored reference graphics.
The benefit of this code is that you can find elements based on the appearance and thus replace the textual locators. For this to work you need to manage the storage of the image files yourself. With large tests this can become a challenge, as more and more images need to be named, versioned and kept up to date. The search for the locator image is independent of the total screen size. Hence, assets can be shared across device types and screen sizes, provided that the element itself does not rescale in proportion to available screen space. To find an element the find_element function is called with an image instead of a text locator.
driver.find_element(AppiumBy.IMAGE, "images/avatar.png").click()
driver.find_element(AppiumBy.IMAGE, "images/my-mot.png").hover()
driver.find_element(AppiumBy.IMAGE, "images/my-mot-hovered.png")
driver.find_element(AppiumBy.IMAGE,
"images/my-proposals.png").click()
driver.find_element(AppiumBy.IMAGE,
"images/contribute.png").click()
driver.find_element(AppiumBy.IMAGE,
"images/title.png").send_keys("My proposal")
driver.find_element(AppiumBy.IMAGE, "images/new-propsal.png")
Code Example 2: Test steps written with Appium, which has the ability to use images to locate the interaction items. This implicitly also checks their visual appearance.
Spot the Difference
Once we have organised our assets to contain the required reference images we need to decide whether we accept potential deviations. As humans we have an idea of what it means to be equal. When comparing two images we can focus on the relevant parts, understand global concepts of alignment as well as local differences in spelling and punctuation. To bring this ability to the computer we need a visual comparison tool. The obvious idea is to search computer vision algorithms for a bag of tricks. Unfortunately, the results are a common cause of frustration. What is going wrong?
Computers are not deterministic. They might have been 30 years ago, when monthly security patches were the only change to your setup and all layouts were positioned by absolute pixels. Today is different. Multiple layers in your rendering stack are in permanent motion. Browsers have new versions, font metrics change and operating systems are testing new rendering methods, balancing speed against precision. These constant changes make it difficult to define an exact reference image, for which a test is meant to pass.
There has been tremendous progress in the field of computer vision. AI has surpassed humans in handwriting recognition and many other tasks of object detection. Modern LLMs are getting even better at processing images. There is a growing number of applications that the AI can understand and deduce their state from just a screenshot alone. There could be a day when changing screen resolutions with a resulting reflow of elements depending on available screen space are testable. Up until now tests usually require a fixed resolution and would require recapture for different screen sizes. Even with this limitation there is a big gap between what would be possible, and what is available. Let's have a closer look at the technological basis for some solutions that are out there today.
The Pixel Matching Problem
Pixelmatch is an image comparison library used by Cypress and Playwright by default. Its algorithm matches images pixel by pixel. With similar results to what some commercial tools are offering, this is a widely used technique with rare adjustments. Appium uses a very similar method from OpenCV. In terms of discussed artefacts there is no fundamental difference between OpenCV and Pixelmatch. The same is true for the less frequently used library odiff. It is compatible with playwright and cypress, but likewise does not pass the tests below.
In the following example we see two versions of an envelope icon. In standard resolution you would need eagle's eyes to see any difference between them. The comparison result produced by pixelmatcher is shown in red. 55 pixels are different. A comparison with a pure white image would only flag a 50 pixel difference. This means that a slightly shifted envelope is reported with more deviation than a missing envelope would. This problem of a half pixel displacement is frequently caused by rounding errors in very dynamic layouts, like CSS grids. On pixel by pixel level the colours could not be more different, although a slightly squinted eye makes them appear equal to humans.

Figure 2: The pixelmatcher library detects huge differences between images that humans would not be able to distinguish at standard resolution.
The next example shows the opposite scenario, where humans would report a large difference but pixelmatcher reports almost none. This is a real problem. The standard approach to low tolerance in image deviations is to adjust the threshold of allowed pixel differences. The following example only reports a 5 pixel error when in fact an 8 is turned into a 5. If part of a larger screenshot this would easily go unnoticed. Humans spend years of their early childhood learning to fear the consequences of numeric imprecisions. Yet, the pixelmatcher doesn't even flinch at a few digits out of place.

Figure 3: The pixelmatcher library doesn't understand the importance of minor pixel changes when they are part of an important value. Unlike humans, it isn't trained to focus on numbers as a major source of information.
In conclusion, it's clear that open-source tools demand considerable fine-tuning before they can deliver consistent and reliable image test results. The task would be easy for humans; at least it would be easy to surpass the quality of pixel comparisons. The algorithms in the open source space rely on very simple rules and make no use of recent advances in computer vision and AI. Two problems must be solved at the same time to make progress in this field: image comparisons must become smarter and the organisation of large image collections should be much simpler than managing a file system.
Commercial solutions
The application of visual methods in test automation can be split into passive and active use cases. Passive image comparisons only checks for visual regressions without impact on how the test is executed. Active image comparisons are defining the continuation of the test based on the appearance and the location of elements on screen. Both approaches have their advantages in certain situations. With the passive approach you can keep your current automation workflow and rely on images only as an additional source of scrutiny. The active approach is helpful if elements cannot be described by textual locators, due to either unstructured rendering techniques or a lack of stable naming schemes.
Applitools is leading the market of passive visual testing tools. Their image comparison algorithm promises to use modern AI to determine if images are different. Indeed, it is able to correctly pass both of the above cases. The shifted envelope is flagged as passed. The altered digits are correctly flagged as failed. Naturally, the service comes with a graphical interface to inspect and approve any deviations. As with all passive visual frameworks, this test runs on top of an existing automation, without demanding any changes to your existing procedure.
There is support for active visual test automation in most commercial no-code test automation suites. There are practical reasons why images are not made the first choice despite their theoretical benefits. First, the image operations are computationally expensive. Simple algorithms suffer from instabilities when comparisons are made too strict. Expensive algorithms might slow down the testing process by too much and thus be reserved for the exceptional cases. For example Katalon Studio can use images by referencing the image file, but users are left alone with organising the files on their system. Tricentis Tosca supports images as cues for interactions. But users have to click through a separate popups to create and later see or update the image.

Figure 4: The user interface of the no-code test automation tool testup.io is entirely focused on images to identify interaction points.
The figure above shows a screenshot of testup.io, a niche provider for test automation services. It is entirely built around the concept of images to identify objects. All interaction locations are specified in relation to visual markers. This makes the test more readable, but also limits the test scope to graphical interactions.
Summary
This article discussed the passive and the active use of images in test automation. The passive use case checks for visual changes in addition to an otherwise self sufficient test procedure. Free tools tend to be overly sensitive to rendering artefacts, or require a tedious setup of tolerances without satisfactory solution. This field is waiting for a major update, because modern AI tools can close this gap. The potential benefits would be numerous. Test scripts would consist of mostly images and thus be readable like a comic. Errors would always be presented in the form of image deviations and test assets could be shared across multiple device types.
Current support is meak, especially in the free domain. The active use case is supported by the free framework Appium for mobile testing. The approach allows interactions with screen regions that are not marked with internal identifiers, or for which textual locators are complicated to find. The problem of this approach in addition to flaky image comparisons is the organisation of images on a file system. Test definitions will be stretched over multiple files and thus difficult to read and update. Image support is more advanced in commercial no-code tools. This benefits the less technical users as they can understand the origin of errors more easily if presented visually.
References:
- Playwright - a free test automation framework
- Cypress - a free test automation framework
- Selenium - a free test automation framework
- Appium - a free library for mobile testing based on Selenium
- Pixelmatch - a image comparison library used by Playwright and Cypress
- OpenCV a free library for image processing
- ODiff - an alternative image comparison library
- Applitools - a commercial service to track changes in images
- Katalon - a commercial provider of no-code test automation tools
- Tricentis - a commercial provider of no-code tst automation tools
- testup.io - a commercial test automation tool focused on images
- A mind map of visual testing topics