How much have we covered so far, and how much more is pending?
I would not be surprised to know that you keep hearing this question in your job as a software tester. When it comes to testing, everyone wants to know: “Where are we with regard to — testing?” and “Are we covering the right areas?”
There are no easy answers to this question, since test coverage is a multi-dimensional topic that spans across multiple dimensions such as structure, functions, data, interface, platforms, interfaces, operations, timings, and more. However, especially when it comes to functional and data test coverage, I see great potential in the model-based testing approach. Model-based testing uses a flow chart or design (model) to aid in understanding and test design. It's like using a map to find the best way to go on a journey. Refer to this article for more details: Model-based testing — Wikipedia.
In this article, we're going to dive into the exciting world of model-based testing using TestCompass. Good testing requires the creation of a comprehensive test design. So, let's explore how TestCompass, a leading model-based testing tool, can elevate your testing game and boost your test coverage like never before!
Introducing TestCompass

- TestCompass is a visual model-based software test design tool with a robust user interface that harnesses your application or feature’s flow model to generate powerful test cases, scenarios, and user journeys.
- It acts as a trustworthy compass for your testing that aims to guide you throughout your testing journey with systematic coverage and impact analysis. Let's take a closer look at some key features that make TestCompass a game-changer:
- Testing Early In The Development Cycle: TestCompass encourages you to consider and focus on the big picture of your product or feature, making it ideal for early testing stages and shift-left testing discussions. From the inception of the software development lifecycle (SDLC), you can identify contradictions, ambiguities, and bugs in requirements and scenarios, giving you as well as your dev team a strong head start.
- Ease of Use: Creating a model with TestCompass is not a tedious task, unlike using conventional UML tools. You can easily drag and drop necessary nodes onto the canvas and connect them to translate requirements into a graphical flow representation. You can also add test data and preconditions to different nodes using a simplistic pane view.
- Multiple levels of coverage: TestCompass provides multiple levels of coverage for any particular app or flow that can be selected, based on the depth of testing required.
- Change Impact Analysis: If there is a change in the requirement or application flow, TestCompass can instantly give you an impact analysis of the changes on your existing tests and help you estimate the testing efforts for the next round.
- Comprehensive Functionality: TestCompass includes functionality to support early model-based testing efficiently and effectively. From drawing test models to generating test cases to running impact analyses, it's a one-stop platform for your test design needs.
Creating A Model With TestCompass
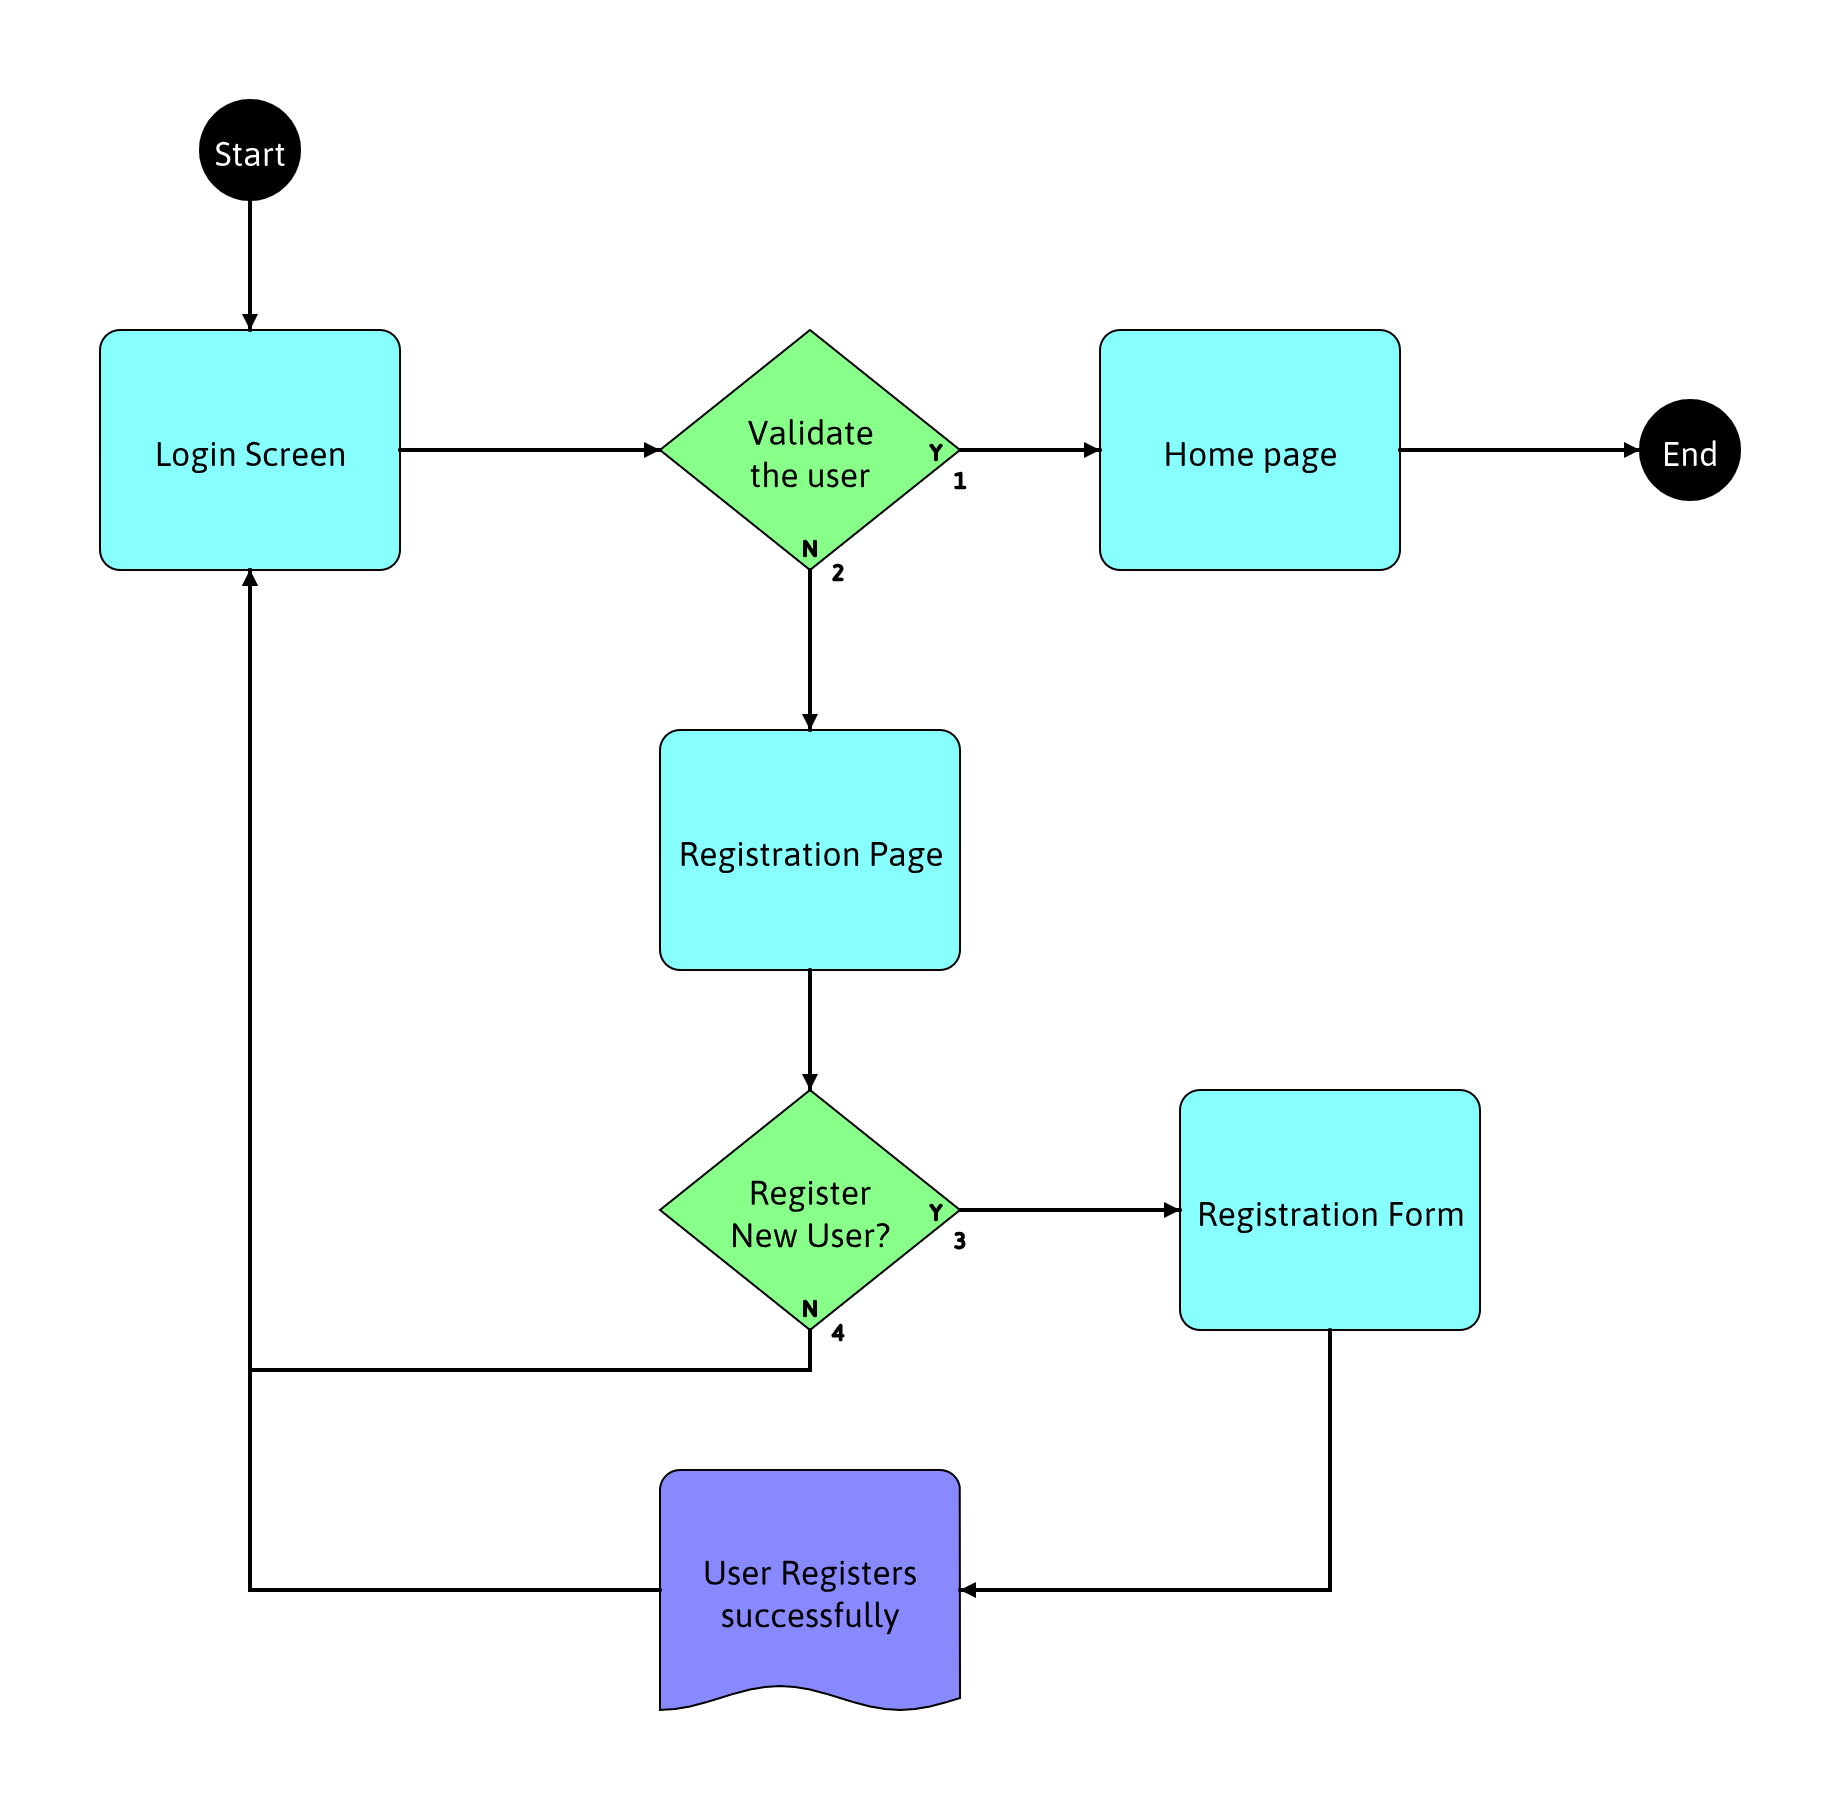
To illustrate how TestCompass works, let's walk through an example of creating a model for the login functionality of an e-commerce application.
Step 1 - Drag and Drop Nodes: Use the intuitive drag-and-drop feature to add necessary nodes, such as actions, states, decisions, and result symbols, onto the canvas.

Step 2 - Connect Nodes: Connect the nodes to define the flow of the application, representing various scenarios and interactions.
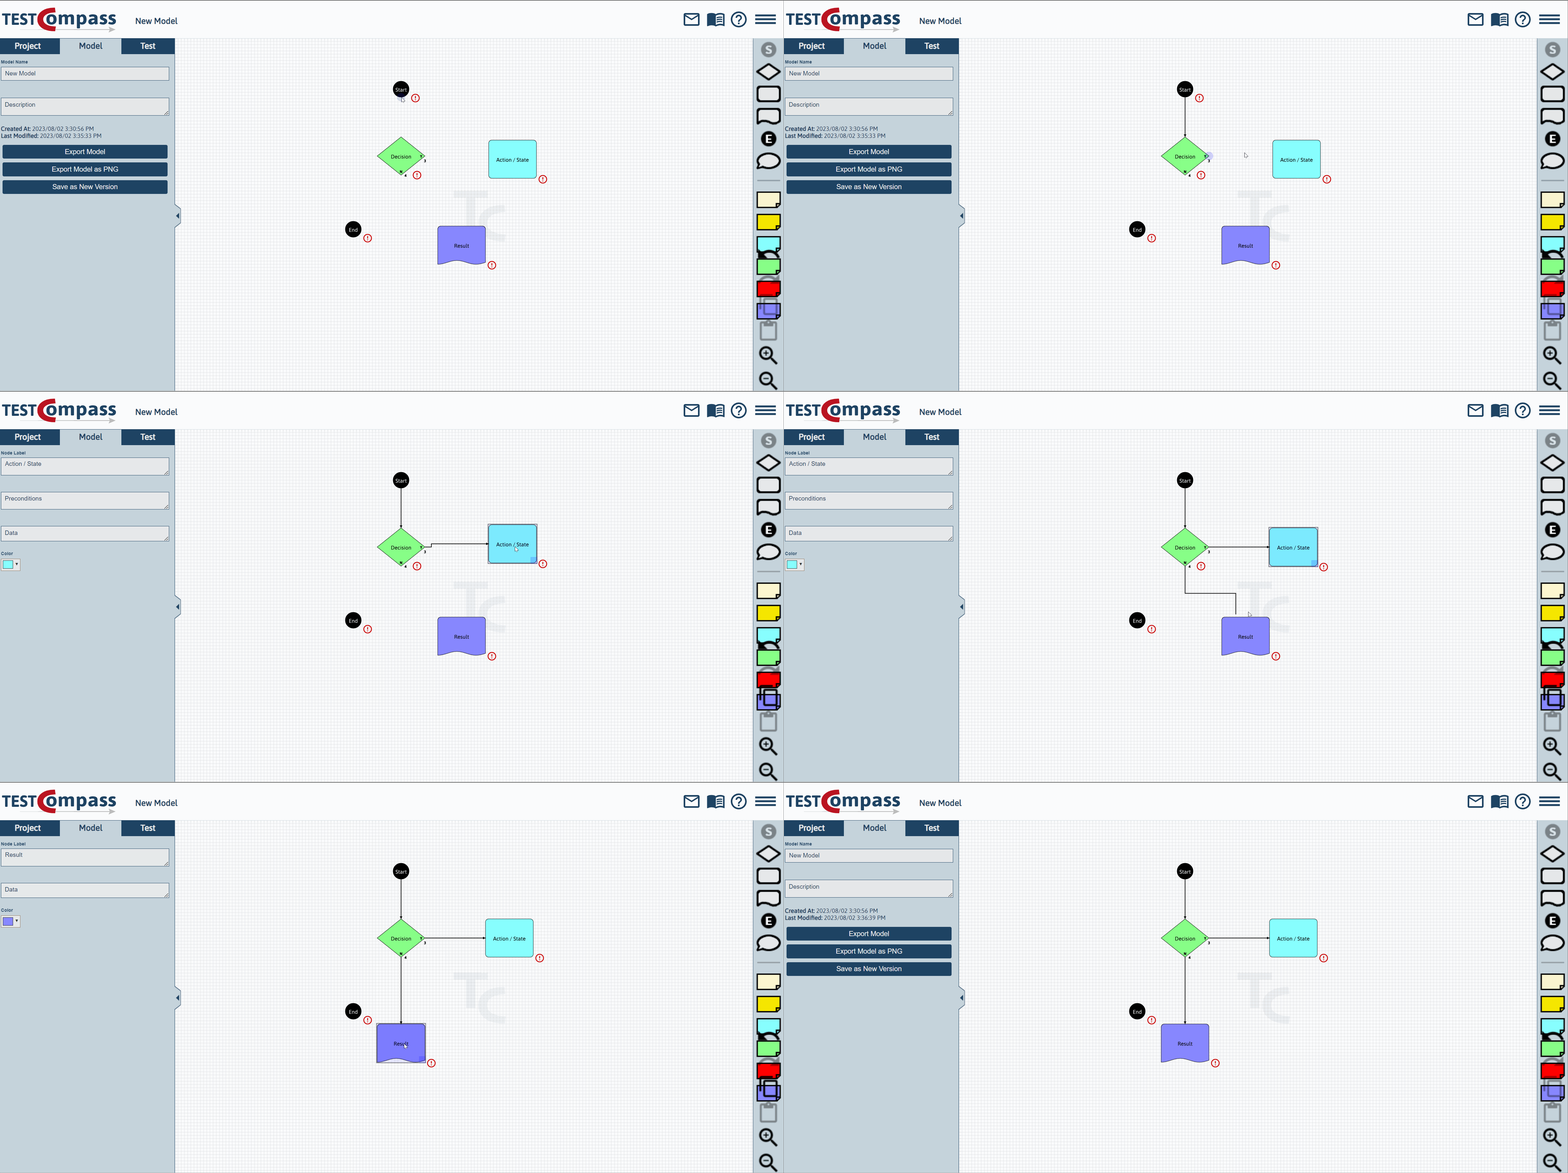
Step 3 - Translate Requirements: Begin by taking the application's login requirements and converting them into a graphical model in TestCompass.
Step 4 - Add Test Data and Preconditions: Enhance your model by adding test data and preconditions to the different nodes, making your tests more robust and realistic.

Generating A Complete Set Of Coverage Levels
Once your model is ready, TestCompass takes it to the next level by generating test designs with a full set of coverage levels. Let’s understand the various coverage levels offered by TestCompass:
Node Coverage: This is the most basic level of coverage level. It ensures that all nodes in the model, including action/state, decision, and result symbols, are tested at least once, covering all flows.

Edge Coverage: This coverage ensures that every connector “line” or edge between each and every node is tested at least once. This coverage is important if you want to examine thoroughly the application's behaviour for any functionality or flow.
Multiple Condition Coverage: This is a special kind of coverage where the tests aim to cover multiple conditions (combinations of two consecutive test paths such as a positive flow and a negative flow) in the model at least once, leaving no stone unturned.
Path Coverage: This is equivalent to exhaustive path testing and is usually recommended for deep testing. With this mode, the test design guarantees testing of all paths possible in the model, from start to end, ensuring a comprehensive exploration of the software.

Change Impact Analysis
One of the standout features of TestCompass is its change impact analysis capability. Let us understand how change impact analysis works and how it helps you find the right testing direction with TestCompass.
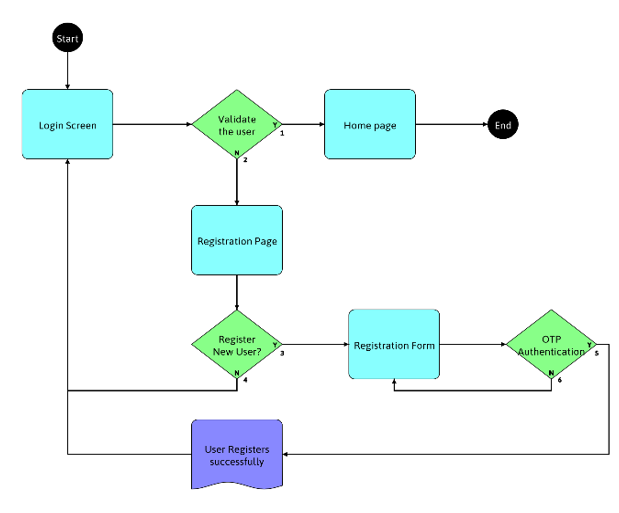
Update the Model: When there's a change in the requirements, simply update the related test model in TestCompass. To understand this, let’s introduce a change in our login flow example. We will now introduce an OTP authentication in the registration process and update it in the model.
Run Impact Analysis: With just a few clicks, you can perform an impact analysis to understand how the update affects your test cases and configurations.
The image below shows how TestCompass prompts you to run an impact analysis after you change the model.

TestCompass runs the impact analysis and shows you a new set of cases on the left of the screen.

Personal Experiences With TestCompass

Having personally used TestCompass for model-based testing, I must say it's a game-changer! Here are some of the benefits I experienced:
- Seamless Test Case Generation: TestCompass makes test case generation a breeze. With a single click, I generated logical and physical test cases and exported them to an Excel file. The Excel file can be imported into any ALM tool, such as Jira.
- Skyrocketing Coverage: The coverage level options in TestCompass ensure that no critical scenario is left untested, providing complete test coverage for your product.
- Early Detection of Issues: Thanks to the models that we generated from this tool, we caught numerous bugs and ambiguities in the requirements right from the start, saving valuable time and resources. The models also helped us to identify areas where we can optimise application flow.
- Product Documentation: The models created using TestCompass can also serve as visual documentation of your product’s flow and is very useful for documentation and demonstration purposes.
- Good Collaboration: The success of model-based testing depends heavily on the creation of a successful product model. This requires both developers and testers to collaborate early to review and ensure that the model is correct.
Challenges And How We Overcame Them

When I started to use TestCompass, I faced some minor challenges, but with the right approach, they were easily overcome. Here are the challenges and my experiences with them:
- Learning Curve: When I was new to model-based testing, understanding the tool and its functionality took a little time. But the product documentation as well as practice using the tool helped me to overcome this hurdle.
- Team Adoption: Convincing the team to adopt a new testing tool required effective communication and showcasing the benefits, but once everyone saw the impact, they embraced it and decided to explore and experiment with it for upcoming features too.
Conclusion

Good test coverage is the cornerstone of effective software testing. With TestCompass, early model-based testing becomes simple and easy, ensuring comprehensive coverage and thoughtful analysis of the impact of requirements or code changes on testing. If you are facing issues with writing tests or finding the right coverage levels for your testing, I encourage you to give TestCompass a try and witness its power firsthand. All the best!
For More Information
- Model Fatigue and How To Break It, by John Stevenson
- Power of Models


